

Introduction
Upgrading the head unit in your Ford Explorer (2011-2019) can enhance your driving experience with modern features and improved functionality. This guide will walk you through the installation process of the SquareWheels G-Series Android head unit, ensuring you have all the necessary information and wiring diagrams at your fingertips.

Tools Required
No specific tools are mentioned; however, standard trim removal and installation tools are likely necessary for panel removal and fitting.
Pre-Installation Notes
- SYNC Compatibility: The SYNC 1 unit is compatible with SYNC 2 and 3 models but does not support vehicles with B&O amplifiers.
- OEM System: The SYNC 1 unit does not retain the original SYNC system. The original car CD player must be removed during installation.
- Installation Method: SYNC 1 installation is different from SYNC 2/3.
Wiring Connections
Understanding the wiring connections is crucial for a successful installation. Below is a list of the connections included with the SYNC 1 harness:
- 12 pin factory reverse camera adapter
- FM/AM Radio ANT adapter
- Factory USB adapter
- Additional hazard light socket
- SIM CARD cable
- GPS ANT
- Screws
- 54 pin factory reverse camera adapter
- AUX-CAMERA cable
- RCA harness
- 4G signal ANT 2X
- USB port 2X cable
- External mic
- Main harness for unit and power
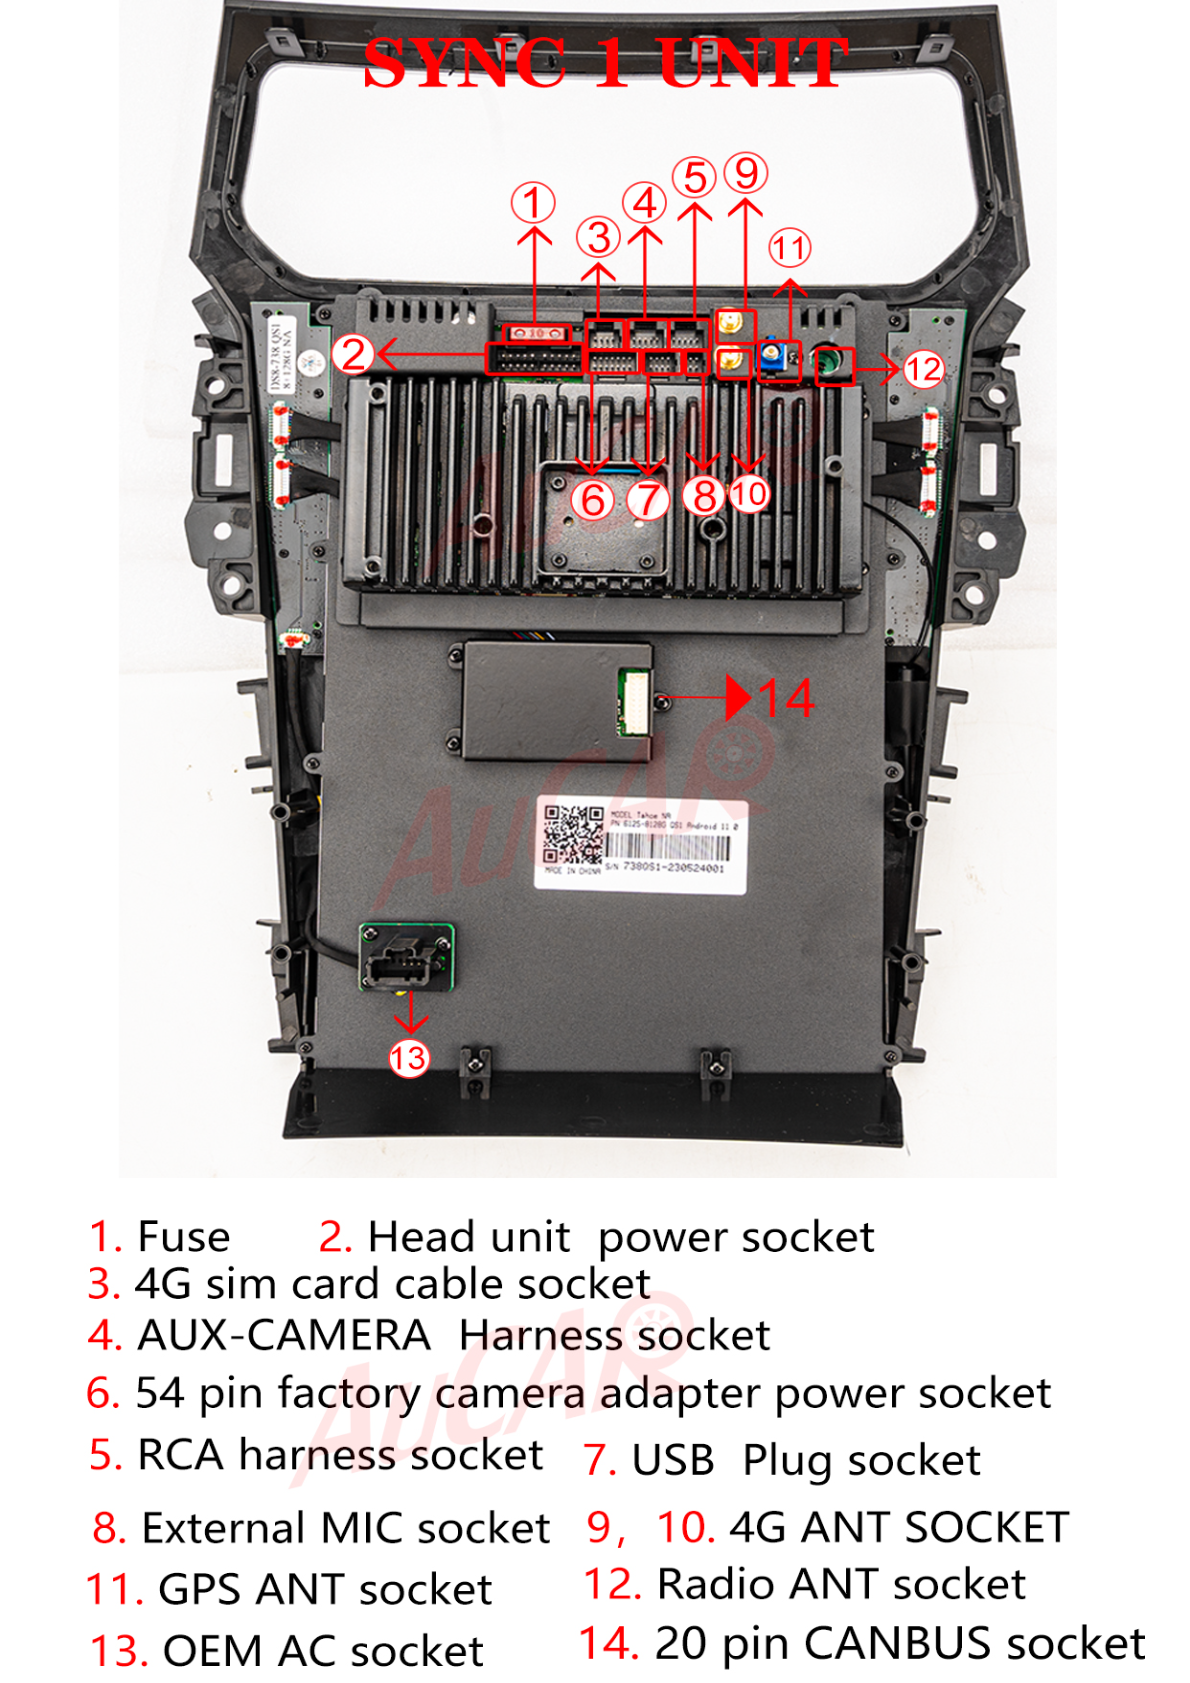
SYNC 1 Unit Sockets
The SYNC 1 unit features various sockets for connections:
- Fuse
- Head unit power socket
- 4G sim card cable socket
- AUX-CAMERA Harness socket
- RCA harness socket
- 54 pin factory camera adapter power socket
- USB Plug socket
- External MIC socket
- 4G ANT SOCKET
- GPS ANT socket
- Radio ANT socket
- OEM AC socket
- 20 pin CANBUS socket
Installation Steps
While specific physical installation steps are not detailed, the following general steps can guide you through the process:
- Remove the factory head unit and trim pieces as necessary.
- Connect the SYNC 1 harness to the corresponding connections in your vehicle.
- Carefully install the new head unit into the dashboard.
- Ensure all connections are secure and test the unit before reassembling the dashboard.
Post-Installation
After installation, ensure that all components are functioning correctly. Since specific testing or reassembly steps are not provided, it’s advisable to check all connections and the operation of the new head unit.
Tips & Warnings
- The installation method for SYNC 1 differs significantly from SYNC 2 or 3.
- Ensure the original car CD player is removed, as SYNC 1 does not support it.
- This system is not compatible with vehicles using B&O amplifiers.
Conclusion
Upgrading your Ford Explorer with the SquareWheels G-Series head unit can modernize your vehicle's interior and provide enhanced functionality. Follow this guide for a successful installation, and enjoy your new system!

For more information on the G-Series head unit, check out the product page here.
Share:
How to Install a Head Unit in Your Ford Expedition (2018-2021): Complete Guide with Wiring Diagrams
How to Install a Head Unit in Your Ford F150 F250 F350 F450 F650 (2020-2025): Complete Guide with Wiring Diagrams